


Table of Contents
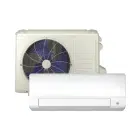
Installing a window AC unit can significantly improve your living space’s comfort, especially during the warm seasons. Not only does a properly installed window AC unit ensure efficient cooling and energy consumption, but it also contributes to the unit’s longevity, saving you money and hassle over time. This guide aims to walk you through the crucial steps of window AC installation, ensuring you can enjoy a cooler environment in no time. With expert insights from HVAC Service Solutions, you’ll gain the confidence to tackle this project, knowing you have the backing of industry professionals.
Tools and Materials Needed
Embarking on the window AC installation journey requires a set of specific tools and materials to ensure a seamless and effective setup. Here’s what you’ll need:
- Measuring tape: For precise measurements of your window and AC unit to ensure compatibility.
- Screwdriver: To secure the unit and any additional fixtures.
- Level: To guarantee that your AC unit is perfectly horizontal, ensuring optimal operation and drainage.
- Drill: For installing any necessary brackets or supports that will hold your AC unit securely in place.
- Brackets, screws, and insulation material: Essential for mounting the AC unit firmly and sealing any gaps to maintain energy efficiency.
- Safety equipment: Gloves and goggles to protect yourself during the installation process.
Before you commence the installation, organize your workspace. Remove any obstructions and layout your tools and materials for easy access. This proactive approach prevents unnecessary interruptions and ensures a streamlined process. If your toolkit is missing any items, Canadian hardware stores are well-stocked with all the necessary equipment. Having the right tools at your disposal simplifies the installation process and contributes to a successful, hassle-free setup of your window AC unit.
Choosing the Right Location for Your Window AC Unit

The strategic placement of your window AC unit is pivotal in maximizing its efficiency, performance, and lifespan. The ideal location is not just about convenience; it’s about harnessing the unit’s full potential while mitigating any factors that could hinder its performance. Here’s a more in-depth look at how to choose the best location for your window AC unit:
- Minimize Sunlight Exposure: Opt for a window that is shaded for most of the day. Direct sunlight on the unit increases its workload and reduces efficiency, as the AC has to work harder to cool the incoming warm air. If your options are limited, consider using window treatments or external shading to minimize heat exposure.
- Proximity to Power Sources: The window AC should be installed near a dedicated power outlet to avoid the use of extension cords, which can be hazardous and may compromise the efficiency and safety of the unit. Using an extension cord can lead to voltage drops and increased resistance, potentially causing overheating or even fire risks.
- Avoid Heat Sources: Installing your window AC unit away from heat-generating appliances or electronics helps prevent the AC from overworking. Heat sources like stoves, ovens, or electronics can emit heat, making the AC work harder to cool the room, thus reducing its efficiency and potentially shortening its lifespan.
- Consider Traffic and Accessibility: Installing the AC in a low-traffic area reduces the risk of damage or obstruction. It’s also crucial to ensure that the unit is accessible for maintenance and filter cleaning, which are essential for optimal performance.
- Ensure Proper Support and Stability: The selected window should provide sturdy support for the AC unit. The window frame and sill should be in good condition to bear the weight of the unit. If necessary, additional support brackets may be used to ensure stability and prevent accidents.
- Space for Air Circulation: Adequate space around the unit is essential for unobstructed air intake and exhaust. Ensure there’s enough clearance around the unit to facilitate proper airflow, which is crucial for efficient operation and cooling performance.
- Check for Obstructions: Before finalizing the location, ensure there are no obstructions that could block the airflow or exhaust. Curtains, furniture, or plants that block the unit can restrict airflow, diminish cooling efficiency, and strain the unit.
By carefully considering these factors, you can select the optimal location for your window AC unit, enhancing its performance, efficiency, and longevity. Proper location selection not only contributes to your comfort but also to energy savings and the durability of your AC unit.
Curious about how much the AC installation will cost? Check out our previous article via the link below.
https://thehvacservice.ca/central-air-conditioner-installation-expenses/
Installing a Window AC Unit: Step-by-Step Instructions
Now is the time to delve into the finer details of the installation process. By closely following these comprehensive steps, you’ll ensure your window AC unit is installed with precision, fostering optimal performance and energy efficiency.
Measure Your Window
Accurately measure the window to ensure compatibility with the AC unit’s dimensions. This is crucial for a secure fit and optimal insulation.
Inspect the window frame’s integrity to guarantee it can support the unit’s weight, making any necessary repairs or reinforcements beforehand.
Install Mounting Brackets
Properly align and secure the mounting brackets on the window sill, following the manufacturer’s guidelines to ensure they’re level and firmly attached.
The brackets must be installed correctly to provide a stable base for the AC unit, preventing any potential movement or sagging.
Place the AC Unit
With assistance, lift the AC unit into place, setting it securely on the mounted brackets. Verify that the unit is stable and level to ensure efficient operation and drainage.
This step is crucial for the unit’s functionality and safety, ensuring it remains securely in place once operational.
Secure the Unit
Lower the window sash onto the AC unit to anchor it firmly in place, utilizing any additional securing hardware provided with your unit.
Ensuring the unit is securely fastened prevents any risks of it dislodging or falling, providing peace of mind and enhancing safety.
Seal the Perimeter
Thoroughly seal any gaps between the AC unit and window frame to eliminate air leaks, using appropriate sealing materials for a tight fit.
Effective sealing is vital for maintaining the unit’s cooling efficiency and preventing external air infiltration.
Check the Tilt
Ensure the unit is slightly tilted towards the outside for proper condensation drainage, adjusting as needed without compromising stability or performance.
Proper tilt is essential for preventing water buildup and ensuring the unit operates effectively and safely.
Remember, a correctly installed window AC unit not only cools your space more effectively but also operates more efficiently, saving you money on energy bills and avoiding unnecessary maintenance issues. Should you encounter any complexities or require professional assistance, don’t hesitate to contact HVAC Service Solutions for expert advice and support. Stay cool and enjoy the comfort of your efficiently cooled space!
If you’re considering installing a new air conditioning system or upgrading your current one, reach out to HVAC Service Solutions. Our experts can guide you through the selection process, ensuring you get the best type of air conditioner tailored to your specific needs, ensuring comfort and efficiency for your space.
Expert Tips on Installing a Window AC Unit from HVAC Service Solutions
Before diving into our list of expert tips, remember that these insights from HVAC Service Solutions are designed to enhance your window AC unit’s performance, efficiency, and lifespan. Here’s how you can get the most out of your cooling system with our specialized advice:
- Maximizing Energy Efficiency: Keep your unit in a shaded area to prevent overworking and boost efficiency.
- Longevity Secrets: Maintain regular checks and clean or replace the air filter monthly during high-use periods.
- Noise Reduction Strategies: Use vibration-dampening pads to minimize noise levels during operation.
- Insider’s Know-How: Familiarize yourself with all your AC’s settings to utilize energy-saving features effectively.
- Optimal Airflow Management: Ensure clear air intake and exhaust paths to maintain efficient operation and prevent overheating.
- Smart Usage Practices: Leverage programmable timers or smart functions to optimize cooling times, reducing energy use and wear on the unit.
By incorporating these practices into your routine, you’ll enjoy enhanced cooling efficiency, reduced energy consumption, and a longer lifespan for your unit.
Conclusion
Successfully installing your window AC unit by following these detailed steps can significantly improve its efficiency and extend its lifespan. If you encounter any challenges or prefer professional installation to ensure everything is done perfectly, don’t hesitate to contact HVAC Service Solutions. Our team of experts is ready to provide you with top-notch installation services and support to keep your space cool and comfortable.
FAQs
What tools do I need for a window AC unit installation?
To install a window AC unit, you’ll need a few key tools: a measuring tape to ensure the unit fits your window, a screwdriver and a drill for securing the unit and its components, a level to ensure the installation is balanced, brackets and screws to mount the unit securely, and insulation materials to seal any gaps. Safety equipment such as gloves and goggles is also essential to protect yourself during the installation process. If you’re missing any tools or unsure about the installation process, HVAC Service Solutions offers professional installation services to ensure your unit is installed correctly and safely.
How do I choose the best location to install my window AC unit?
The optimal location for a window AC unit should have minimal direct sunlight, be away from heat sources, and close to an electrical outlet. The window should also provide sturdy support for the unit and allow for proper air circulation for efficient cooling. Ensuring the unit is placed in a location that avoids obstructions can significantly enhance its performance. If you’re uncertain about the best placement for your AC or need help with installation, HVAC Service Solutions can provide expert guidance and professional installation services.
Why is it important to ensure the window AC unit is level when installed?
Ensuring your window AC unit is level is crucial for two main reasons: it allows the unit to drain properly, preventing water buildup and potential damage, and it ensures efficient operation, as the unit’s internal components are designed to function optimally when level. An improperly leveled unit can lead to inefficient cooling and even shorten the lifespan of the AC.
What are some expert tips for maximizing the energy efficiency of my window AC unit?
To maximize your window AC unit’s energy efficiency, position it in a shaded area to reduce its cooling load and use energy-efficient settings. Additionally, maintaining the unit, such as cleaning or replacing the filter regularly, can prevent excessive energy use. Using window treatments like curtains or blinds to keep heat out can also reduce the cooling requirements for your unit.
How can I reduce the noise from my window AC unit?
Reducing noise from your window AC unit can be achieved by ensuring it’s properly installed and level, using vibration-dampening pads or noise-reducing insulating materials around the unit. Regular maintenance checks can also identify and rectify any issues causing excessive noise.
Why do I need to check the tilt of my AC unit during installation?
The tilt of your window AC unit is essential for proper drainage of condensation. The unit should have a slight tilt towards the outside to allow water to drain away from the unit, preventing water from pooling inside or dripping indoors, which could cause damage or affect performance.
How often should I clean or replace the air filter in my window AC unit?
The air filter in your window AC unit should be cleaned or replaced monthly during peak usage to ensure optimal air quality and efficiency. A clean filter prevents the unit from working harder to pull air through, reducing energy consumption and prolonging the unit’s lifespan.
What should I do if there are gaps around the installed AC unit?
If there are gaps around your installed AC unit, you should seal them with appropriate insulating materials like foam or weather stripping. This prevents air leaks, which can reduce the unit’s efficiency and allow pests or moisture to enter your home.
Can I install a window AC unit by myself?
While it’s possible to install a window AC unit by yourself if you have the necessary tools and follow the instructions carefully, professional installation is recommended to ensure the unit is installed safely and efficiently. HVAC Service Solutions offers expert installation services to guarantee your unit is set up for optimal performance.
Who should I contact for professional window AC unit installation?
For professional window AC unit installation, contact HVAC Service Solutions. Our team of experienced professionals can ensure your unit is installed correctly, providing you with peace of mind and the best possible performance from your AC unit. Whether you need assistance with installation, maintenance, or choosing the right unit for your space, our experts are here to help.
Share


